


VOCAL EQUALIZATION (PART 3) - Panning

You don’t have to be a trained engineer to make effective personal mixes. As long as you practice a few basic and foundational steps, your personal mixes will allow you to hear what you need to perform your best.
In the previous post, we looked at building the foundation for your mix. The foundation starts with establishing your pitch reference, and your timing reference. These might be different for each performer and from song to song. Being able to clearly hear the channels that help you stay on pitch and keep you together as a team are the key foundational elements of a personal mix.
So what do we add next? The answer is not so much WHAT we add, but WHERE we add it. I’ll explain.
We live in a 3D world (4D if you subscribe to the theory of time as a dimension) and sound comes at us from everywhere. When playing on stage, you have band members to your left, to your right, maybe behind or in front of you. We see where people are located, but we often forget to place them somewhere in our mixes.
We see where people are located, but we often forget to place them somewhere in our mixes.
The next post will deal with other tools at our disposal, but if you never read the next post and just master volume and panning, you will make some very effective personal mixes.
A good mixing method is to:
1. Establish your timing reference
2. Add your pitch reference
3. Add the “directional” channels you
may need. Directional channels will likely be the song leader, or
perhaps someone on an intercom. Some churches play by the chart, others
play a bit more loose, and others are entirely spontaneous. Make sure
you know where you are going by adding the directional channels.
4. Add you (the channels that you are in control of)
5. Add the rest with restraint
Let’s get down to it and make a mix. Lets say our band is made up of
drums, bass guitar, acoustic guitar, a couple electric guitars, two
keyboards and four vocalists. This is a pretty good-sized band, but not
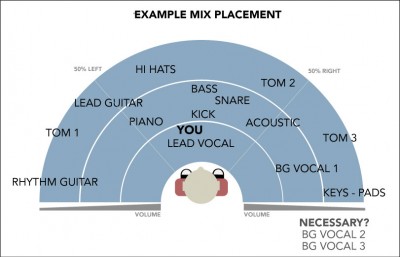
atypical in many church scenarios.For you visual thinkers, this chart is an example and ties into what we are talking about below.
ALSO SEE: SOUND EQUALIZATION
For the purposes of this mix, lets mix for a vocalist. The pitch reference will be the acoustic guitar and the keyboard playing piano. The timing reference will be the drums, but more specifically the kick, snare, and hats. The directional track will be the lead vocals.
As a rule of thumb, the kick and the bass go right up the center. Everything else should be pushed off to one side of your ear or the other. Lets start by placing the kick in the center then bring up the bass so those two are near each other in volume. The snare can sit in that same area, especially since the kick and snare are generally not playing at the same time, so bring up the snare so it cuts through, but isn’t annoying. The high hats don’t need to be in the middle, lets make room for them by panning them off to the left by about 20%. You will still hear some of the hats in your right ear, but they will be more prominent in the left. If stereo overhead mics are available, pushing these out 75-100% to the left and right can add great space to the drums.
Next we add in our pitch reference. It can be tempting to put these right up the middle as well. Spacing these channels out will help us as we add more instruments. Place the piano track at 10-20% left and acoustic guitar at 10-20% right. They should be just below the kick in volume.
Now bring up the lead vocal so it sits well just on top of everything. Slowly bring up your own instrument or vocal so you can hear it well in relation to the mix. It will be tempting to make yourself the loudest track, That’s not “wrong” but you want to make sure you are hearing yourself relative to the other parts we already mixed. You may want to pan yourself off to one side or the other, maybe 15-20%.
If that was all you did, you should have everything you need to perform your best. Don’t fall to the temptation to add everything that is on stage. You may not need to hear the toms, or the rhythm electric if they are following the acoustic. Ask yourself what would help you perform. As a background vocalist, you probably need to hear the other two background vocalists. Bring them up, but not as loud as everything else. Maybe group them together and pan them opposite you by 20%.
Bring up the lead guitar, but push it 60-70% off to one side. Bring up pads, but almost so low that you can’t hear them, just let them be there to provide some glue to the mix. Bring the electric rhythm up just above the pads, but pan them opposite the lead guitar by 70%.
Don’t let the additional instruments interfere with the foundation you created. Keep it simple. Remember:
● You don’t need to hear everything.
● We have two ears, use them by panning channels to the left and right .
● Let your own track sit in the mix a bit, make it part of the mix not the only thing you can hear.
● Practice. It might be helpful to pan instruments according to where they sit on the stage relative to you.
● Ask for help if you need it!
VOCAL EQUALIZATION (PART 3) - Panning
 Reviewed by Admin
on
1:00:00 PM
Rating:
Reviewed by Admin
on
1:00:00 PM
Rating:
Reviewed by Admin
on
1:00:00 PM
Rating:


Post a Comment